When we were talking on Saturday, you mentioned that meditating for only a few minutes a day can help increase grey matter in your brain. I know it’s a good practice, but I’ve found it challenging to sustain it daily. Your comment got me thinking again.
First, that I will try, again, to build meditation into my day. Every day. (I started on Sunday morning with 7 minutes and am up to 10 already. Yay! This TEDx video is adding to my motivation.)
It also made me think that small investments in time can often yield benefits that endure. I thought of getting together with good friends, or exercising for just half an hour. Both of those make me feel better and last well beyond the actual time spent.
Oven drying apples and pears is the same: A little effort goes a long way and gives a generous result. (Rather like the slow roasted tomatoes you introduced me to.)
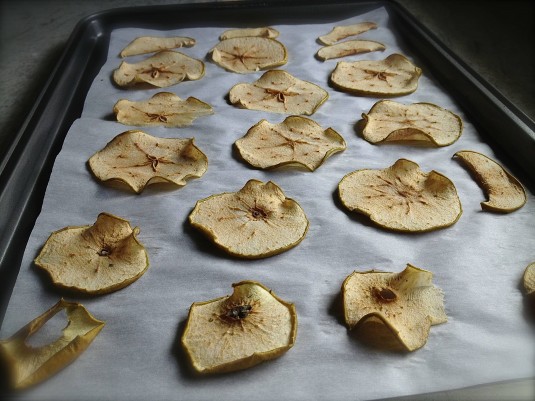
The oven drying takes just under an hour, plus a few more hours to completely dry. Mostly it’s not active time, just a matter of being around so you can keep an eye on the fruit slices while they’re in the oven.
And what you get are compact slices of amped-up apple and pear, concentrated flavor in a sweet, chewy bite. Delish.
They can be used a number of ways. So far I’ve tossed them on top of green salads and stirred them into hot cereal. (The cereal was particularly good.) They would jazz up a cheese plate, particularly if a cambozola or roquefort were involved. And I bet they would be heavenly dipped in some dark chocolate. Oh yes, dried pear and chocolate. Now that’s a thought I can meditate on.
Recipe Tip: You’ll find a number of techniques for drying pears and apples – like soaking the fruit in water with lemon juice added, using a greased pan or oiled oven rack to place the fruit on. What I found worked best is an extremely simple approach, with no oil or lemon involved. Here are my suggestions:
- Use firm fruit. It’s easier to get the slices thin and produced a better (drier) result. I used a Granny Smith apple and both Bartlett and Bosc pears.
- If your slices are thin enough, you won’t need to brush them with lemon juice or soak in a water/lemon juice solution. (I brushed half of the pear slices with lemon juice but couldn’t see any difference with the plain ones once they were dried.)
- Unless you’re particularly seed averse, don’t bother coring the fruit. Leaving the seeds in is easier, and they look quite pretty.
- Use parchment-lined baking sheets, and place the slices directly on the parchment – no oil required.
Ingredients
- 1 crisp apple and 1 firm pear
Instructions
- Preheat oven to 200°F. Line a large baking sheet with parchment paper.
- Slice the apple and pear crosswise into thin slices, about 1/8” thick. If you have a mandoline this is a good time to enlist it. If you don’t (or if it’s in storage like mine is) use a sharp chef’s knife.
- Place the slices evenly on the parchment-lined baking sheet and place in the oven. Let the slices dry for about 45-60 minutes. It’s a good idea to check them at the 45-minute mark, as the thinner slices will start to get toasty brown then.
- Remove the baking sheets from the oven and let them cool for 5-10 minutes. Carefully peel the slices from the parchment, and transfer to a cooling rack to finish drying. This may take a few hours. Store in an airtight container for up to a week.


[…] slices oven dried apple, […]